Miata Mods
So Subdued, It’s Comatose
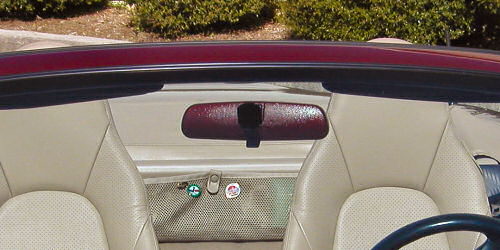
I didn’t put anymore than the 6 coats I did yesterday on the mirror. When I got up this morning I was tempted to paint it silver and start again, but didn’t. When I held it up to the car in the garage it was definitely Garnet Red, just kind of pebbly and matte and uneven. I decided I should spray some clear coat over the top and see if that helped. Of course I had to run to Autozone and spend another $4.43 on a can of paint. After 4 light coats of clear it cured the matte and unevenness. The texture, I knew, was there to stay.
Re-installed the mirror and looking at it in the garage you can’t even tell. The color is so dark and the angle of the windshield make it look as if nothing was done. Even outside in the daylight, if you didn’t know it was painted, you would never know. Perhaps on a bright day and with the sun at the right angle….I do like subtle mods, but this one is perhaps a little too understated.
I’m not sorry I did it, but this mod would probably be much more noticable on a lighter colored car like, white or silver. Should look real good on the primary colors too, classic red, mariner blue, or a 10AE. Of course if your Miata is black, this mod is already done for you at the factory. 😀
Miata Top Transitions since 01/01/05: 80
Shoulda Primed
When I got home from work I removed the rear view mirror and masked off the front, the day/night tab and the mounting arm. I wiped it off with some alcohol to get rid of my finger grease and sprayed on coat number one.
The cover that is on the Mazdaspeed mirror is nice and smooth and glossy. The stock mirror housing is matte black and has a pebbled finish. I had zero plans of trying to sand it down to smooth, that is way too much work, I’m just want to make it car colored. This paint that came from PaintScratch.com is pretty thin so I knew I’d need a few coats to get the black mirror to look Garnet Red and so far I am up to 5 and it is starting to get there. Probably get one more on tonight and then a couple three in the morning. Hopefully that’ll do it.
I know now that if I do decide to do the brake calipers, I’ll prime them with some silver first…
Miata Top Transitions since 01/01/05: 78
Side Maker Lights
I only did the rear side marker light mod today at tech day. I decided against the blinking side markers because, at least for the rears and maybe the fronts, if you make them turn signal indicators they would lose the parking/running light ability, which is what I really wanted.
Today’s Tech Day could have been called Electrical Tech Day as most of the work done was to the wiring of the cars. I did the side marker thing, 2 folks added air horns and two folks did the power window switch repairs. One member took the discarded stock horn from an’04 with new air horns and added it to their existing stock ’90 to double their noise value for free.
I guess I’ll go add the $8.46 I spent on parts to the BTR Equipment Package list.
Miata Top Transitions since 01/01/05: 55
Goodbye License Plate
What amounts to the shortest Mod reversal in my Miata career occurred tonight, after only 9 days I took off my Faux Japanese Plate.
I thought I might have had a taker for it in the Miata.net community, but I haven’t heard back, so I guess not. May try and sell it on eBay. I’ll box it up on Monday and see what it weighs, then I’ll list it. Unless somebody reading this wants it, $25 plus shipping that is the plate and the custom mount for a Miata.
Miata Top Transitions since 01/01/05: 23
Tokyo Taxi
Got the Japanese front license plate mounted this evening. A friend at work made up a mount out of 1/8 aluminum and bent it according to my fancy-schmancy AutoCAD drawing. According to Tim, he doesn’t do holes or windows, so I spent my lunchtime drilling the 4 mounting holes and the 2 plate mounting holes (both in the bracket and the plate.)
Tonight when I got home I painted the bare aluminum with some flat black paint that I last used to cover up the stock muffler, which for whatever reason, was plainly visible in the rear view of the car.
Although there are four holes in the mount, there are only three used to bolt it to the car. Because I didn’t want to have to disassemble nearly the entire front underbody plastic cladding to have unfettered access to the mounting points, I managed to only get two bolts in. After once again dropping the 3rd bolt on the third attempt, I gave up. Believe me when I say that 2 is more than sufficient to hold this little license plate and it’s bracket to the car. The things I took out were there to tie down the car to the deck of the ship that brought it over from Japan, one bolt would probably be enough…
Miata Top Transitions since 01/01/05: 17

